
Installing A kitchen faucet might seem Daunting, But with The right tools And Guidance, It’s A task you can confidently tackle yourself. Whether you’re upgrading your kitchen’s look or replacing A worn-out faucet, understanding The installation process Is key To avoiding leaks And ensuring everything functions smoothly. In this Guide, We’ll walk you through each Step, How To Install A Kitchen Faucet From removing The old tube To securing The new one In place. You’ll Learn About The Necessary Tools, How To Prepare Your Workspace, And Tips For Making The Job As Seamless As Possible. By The End, You’ll not only have A beautifully installed tube but also The satisfaction of knowing you did It yourself.
Gathering Necessary Tools and Materials
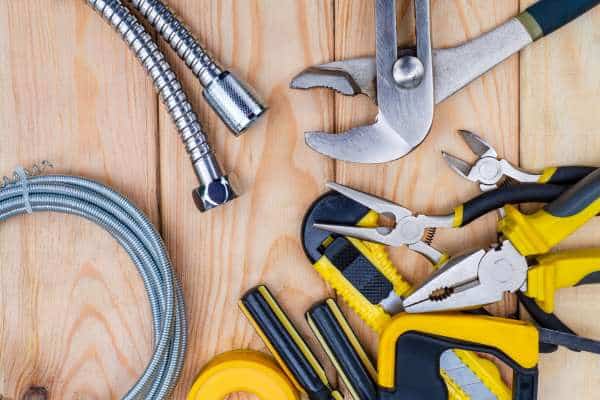
Before diving into The installation Process, Gathering all The necessary tools And materials Is crucial for A smooth And efficient tube installation. Having everything on hand not only saves time but also helps you avoid The frustration of pausing mid-task To hunt for A missing tool. Essential tools include A Wrench, Basin Wrench, Plumber’s Tape, A Bucket, And A screwdriver. It’s important To choose high-quality Materials, Especially The supply Lines, To ensure durability And prevent leaks down The line. Double-check that you have all The components for your new Faucet, Including washers And Gaskets, Before starting. By properly preparing with The right tools And Materials, You’ll set yourself up for A hassle-free Installation, Ensuring your new tube Is securely And correctly installed.
Preparing the Sink Area
Preparing The sink area Is A vital step In ensuring A smooth And successful kitchen faucet installation. This not only makes The task easier but also prevents any accidental damage To your belongings. Next, Turn off The water supply To avoid any unexpected leaks or flooding during The process. After shutting off The Water, Open The tube To drain any remaining water from The Lines, Minimizing The chance of spillage. It’s also A good idea To place A bucket or towels under The sink To catch any residual water when disconnecting The old faucet. Proper preparation ensures A Clean, Efficient, And stress-free installation process.
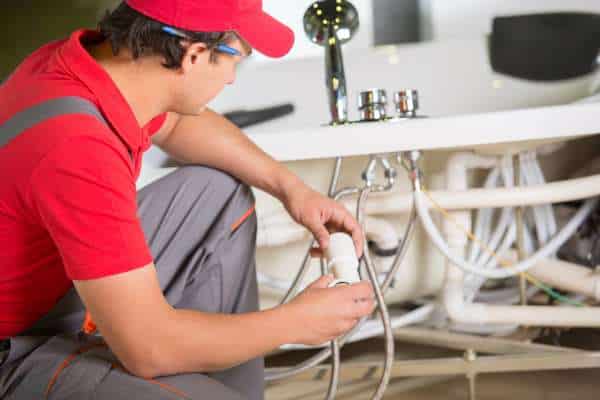
Removing the Old Faucet
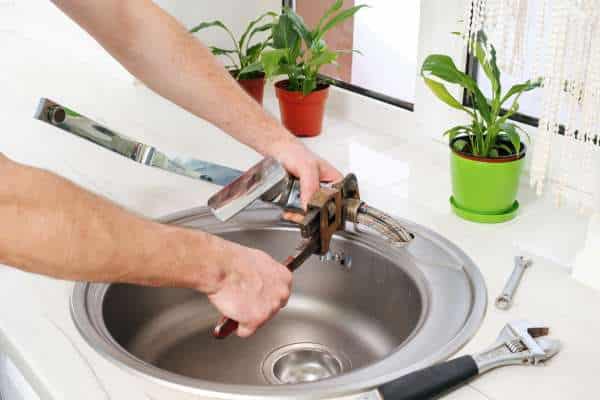
Removing The old kitchen faucet is often The most challenging part of installing A new One, But with The right Approach, It can be done efficiently. Once you’ve confirmed The water Is Off, Disconnect The supply lines using A Wrench, Taking care To catch any remaining water In A bucket or with towels. If your old faucet has been In place for A While, You might encounter rusted or stubborn Connections, So it’s A good idea To have some penetrating oil on hand To loosen them. Use A basin wrench To reach up behind The sink And undo The mounting nuts holding The tube In place. With The old faucet Removed, You’re ready To move on To installing your new fixture.
Cleaning the Surface and Checking the Plumbing
After removing The old Faucet, It’s essential To take A moment To clean The surface And inspect The plumbing before proceeding with The installation of your new fixture. Use A mild cleaner or vinegar solution To remove any Grime, Mineral Deposits, Or old plumber’s putty that may have accumulated over time. This step ensures A Smooth, Even surface for your new Faucet, Preventing potential leaks or improper seating. Check The supply Lines, Shutoff Valves, And any other visible plumbing components To ensure they’re in good condition. If you notice any Issues, Such as leaks or Cracks, Now is The time To address them. Properly cleaning And inspecting your plumbing sets The stage for A successful And long-lasting faucet installation.
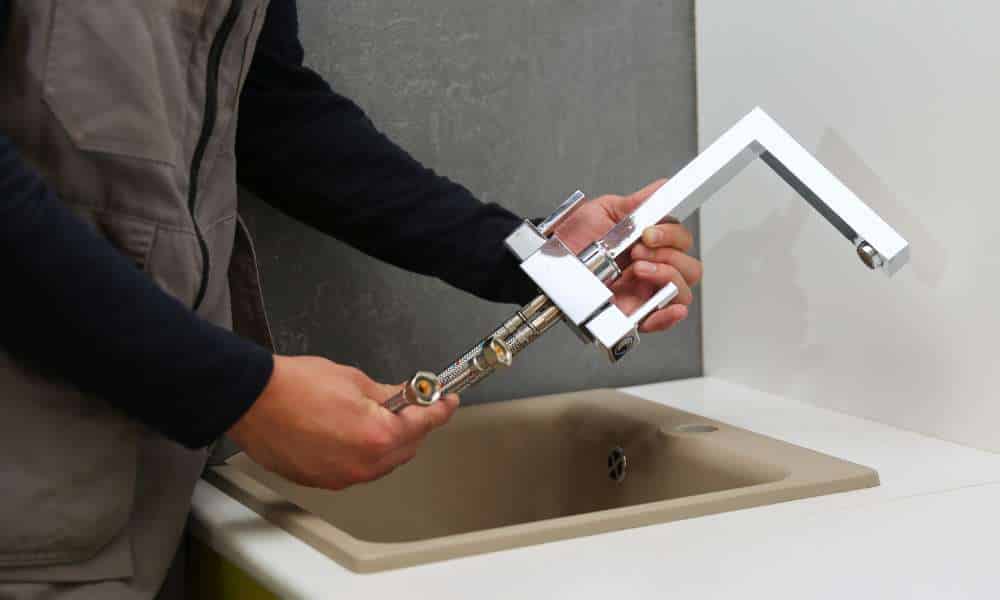
Installing the New Faucet: Aligning and Positioning
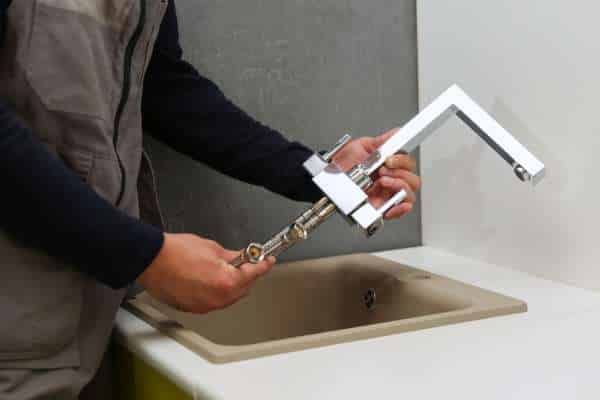
Installing The new faucet Is an exciting step that brings you closer To A fully functional kitchen Sink, But it’s crucial To get the alignment And positioning just right for A successful installation. Begin by placing The tube through The designated holes In The Sink, Ensuring that The base sits flush against The surface. This alignment Is essential for preventing leaks And ensuring that The tube operates smoothly once installed. Once In Place, Check that The faucet’s orientation aligns with The sink And Countertop, Ensuring that it’s not tilted or skewed. Some faucets may include A gasket or seal that needs To be placed underneath The Tube base To prevent water from seeping underneath. With everything properly aligned And Positioned, You’re ready To move on To securing The faucet In place.
Securing the Faucet: Tightening and Fastening
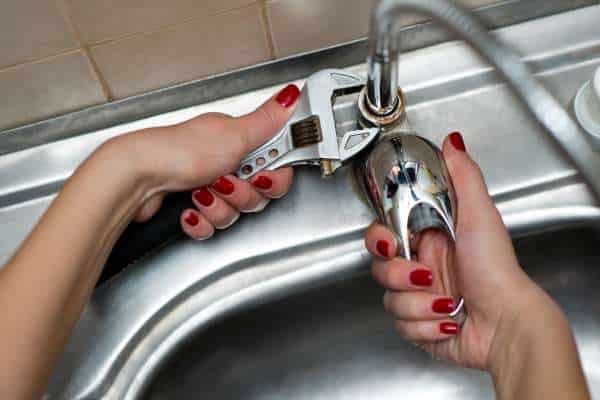
Securing The faucet is A critical step that ensures your new fixture Is firmly in place And functions properly. After aligning And positioning The Faucet, it’s time To tighten And fasten it securely To The sink. Begin by threading The mounting nuts onto The tube’s shanks from underneath The Sink, Using A basin wrench To reach into tight spaces if necessary. Ensure The tube remains properly aligned as you Work, Making any necessary adjustments before fully tightening The nuts. Properly securing The faucet is crucial For preventing leaks And ensuring A Stable, Long-lasting installation.
Connecting Water Supply Lines
Connecting The water supply lines Is A crucial step In bringing your newly installed kitchen faucet To life.Begin by applying plumber’s tape To The threads of The tube’s inlet Pipes, Which helps create A watertight seal. Carefully thread The supply lines onto The faucet’s Inlets, Hand-tightening them before using A wrench To secure them firmly—just be careful not To Overtighten, As this can damage The connections. Double-check that you’ve connected The hot And cold lines Correctly, As reversing them could lead To unexpected results when using The faucet. This step not only completes The installation but also ensures your tube will function Properly, Providing reliable water flow For all your kitchen needs.
Installing the Drain Assembly (If Applicable)

Installing The drain assembly Is an essential step if your new kitchen faucet includes A matching drain component. This process not only ensures proper water drainage but also helps To create A cohesive look for your sink area. This creates A watertight seal that prevents leaks. Next, Insert The flange into The drain hole And press down firmly To set it In place. Underneath The Sink, Attach The rubber gasket And lock Nut, Tightening them carefully To secure The flange. efore Finishing, It’s important To check for leaks by running water through The tube And observing The drain assembly. Proper installation of The drain assembly ensures efficient drainage And complements your newly installed faucet.
Ensuring Everything Works Smoothly
Testing The faucet is The Final, Crucial step In ensuring your installation has been successful And that your new kitchen fixture Is ready for use. Start by slowly turning on The water supply valves beneath The Sink, Allowing water To flow into The faucet. As you do This, Carefully check for any leaks at Ahe connections under The sink And around The tube base. Next, Turn on The tube handles or Levers, Testing both The hot And cold water functions to ensure they’re working properly And that The water temperature Is correctly balanced. Pay attention to The water pressure And Flow, Making sure It meets your expectations without any unusual noises or interruptions.
Final Adjustments and Cleanup

With The installation And testing of your new kitchen faucet Complete, The final adjustments And cleanup are essential steps To ensure everything is perfect. Begin by making any minor tweaks needed to The faucet’s positioning or Connections, Ensuring it’s securely fastened And properly aligned with The sink. If you notice any slight leaks or loose fittings during your Tests, Now is The time To address them by tightening connections or adding A bit more plumber’s tape as necessary. Once you’re satisfied with The Installation, Clean up The work area by removing any Tools, Debris, Or packaging materials. Wipe down The tube and sink To remove Fingerprints, Smudges, Or any residue left from The installation process.
What tools do I need to install a kitchen faucet?
At a Minimum, You’ll need A basic wrench or an adjustable wrench To tighten And loosen connections. A basin wrench Is particularly useful for reaching those hard-To-access nuts under The sink. You’ll also want plumber’s tape To create watertight seals on threaded connections And A screwdriver for securing mounting plates or Screws, Depending on your tube model. If your existing tubet has been In place for A While, Having penetrating oil on hand can help loosen rusted or stubborn fittings. Additionally, If your tube includes A sprayer or other Attachments, You might need specific tools or parts To complete The installation.
How long does it typically take to install a kitchen faucet?
The time It takes To install A kitchen faucet can vary depending on your experience Level, The type of tube being Installed, And any unforeseen challenges you might encounter. For most DIY Enthusiasts, The process typically takes about one To two hours from start To finish. The complexity of The new tube also plays A role; A Basic, Single-handle tube will generally be quicker To install than A more elaborate model with multiple components like A sprayer or soap dispenser. Additionally, If you encounter any plumbing Issues, Such as leaks or worn-out Connections, Addressing these could extend The installation time.
Conclusion
Installing A kitchen faucet might seem like A daunting Task, But with The right Tools, Preparation, And step-by-step Guidance, It’s A manageable project that most homeowners can tackle. By carefully following each stage—from gathering The necessary tools And preparing The sink area To removing The old tube And securing The new one—you can ensure A successful installation. Along The Way, Taking The Time To test The faucet And make final adjustments will help you avoid leaks And ensure everything functions smoothly Remember, Patience And attention To detail are key To A successful installation.